
How to paint loose watercolour holly and berries in 8 quick steps
How to paint loose watercolour holly and berries in 8 easy steps – A mini sketchbook tutorial

This simple step-by-step holly and berries painting guide is going to be a mini sketchbook tutorial, which is fantastic for a quick practice painting session. It uses simple watercolour techniques to create the perfect holly and berries.
It is such a magical time of year, and I love to go on winter walks to find inspiration among the trees and evergreen winter shrubs, to complement my watercolour winter paintings.
In this tutorial I’ll show you how to capture the textures of the holly leaves by creating watermarks and using the colour layering technique. It will really pop off the paper by adding a contrasting colour, and I will even show you how to make your berries shine!
This time I worked completely from my minds eye, but you may prefer to find a reference photo, or you can paint along just by looking at the progress photos I’ve provided.
Are you ready? Lets go….
What you’ll need:
If you don’t have the equipment and paints I recommend, get creative and try with what you have handy.
- A photo of holly and berries or a real life sprig as your reference.
- HB Pencil
- Mop paintbrushes – Rosemary & Co Size 10/0
- Daisy palette (for mixing watery paints)
- Water bowl
- Paper towel
- Watercolour paper (I recommend Arches cold pressed paper)
- Paints (see colour list below). I use Winsor and Newton paints.
Paint colours needed:
- A green colour (I used Olive Green)
- A yellow colour (I used Windsor lemon)
- A deep pink (I used Permanent Rose)
- A red colour (I used Alizarin Crimson)
- A dark brown colour (I used Burnt Umber)
- A blue colour for a contrasting background (I used Cobalt Blue)
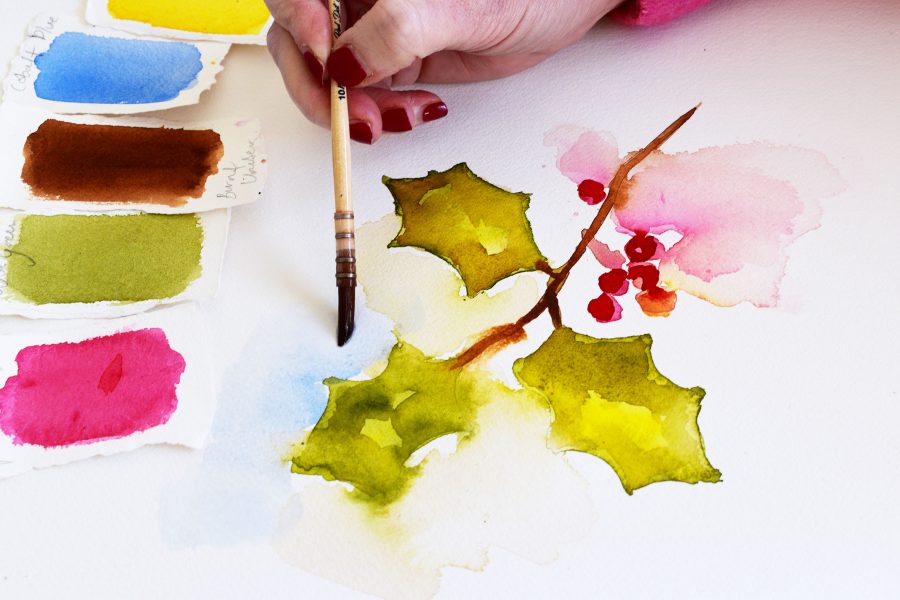
Place your reference piece as near as you can to your paper. This will help you to get as close up as possible to observe the shapes of colour and tonal variations as you paint.
*TOP TIP* – Keep your mixes watery and light, this helps you work fluid and fast and not commit to your shapes, make sure you keep your kitchen towel handy!
Step 1: Start with an olive green watery mix. First draw the outline of the holly leaf and then slowly drag the colour into the centre of the leaf to start creating the colours of the centre. Mix up a watery yellow mix and start to drop this into the centre of the leaves where you see lighter shades, this will mix with green and create different hues of green on the paper, this will add to the vibrancy of the leaf. Let the colours settle together.


Step 2: Next you will need a watery brown mix to create the stem. Start at the tail of the holly leaf and drag your brush down and away from the leaf. Once you have the main stem, drop some water onto the stem to make the colours run slightly to create areas of light on the stem. You then need to decide on the composition of your holly sprig. Place the stems where you would like them (or copy your point of reference) Drag out the stems from your main stem, where you would like the berries to sit.


Step 3: To create more leaves, we are going to deepen our green hue with some additional black colour using the same technique as above. Paint as many leaves as you would like to include in your composition. Remember, start with the outline of the leaf and then add the green to the centre and then drop in your yellow colour to create a mix of hues on the paper. Each leaf is unique!


Step 4: Creating the berries. I’m mixing up my pink colour and placing out each berry where I would like them to be. If the colours merge with the branch, it doesn’t matter as this adds to the loose effect. Drop in your yellow colour to each berry to create an orange hue. Here i am going to start adding touches to the background. With the yellow paint, drag out the berry and the stem to create a soft blended wash.


Step 5: Back to the leaves. Using the wet paint from the centre of the holly leaf, drag out the yellow hue into the background to create a soft effect. When you are happy, let everything completely dry. As it dries you will see the watery mixes creating lots of different textures, which gives the leaves all their individuality. It’s so exciting to watch!


*Top Tip*: Remember to change your water as often as necessary to stop your colours from becoming muddy.
Step 6: Now our painting is dry, we can strengthen our colours. Mix a slightly thicker consistency of your darker red hue. Apply this to your berries, making sure to leave some of the previous layers untouched to let your berries shine! To this mix, add some yellow, to make an orange to reinforce the orange hue of the berries.


Step 7: It’s time to revisit the leaves. Mix a slightly thicker consistency of your green and brown to create a darker shade of green. Add to your leaves, to create shadows and form, remembering to preserve the watermarks and layers underneath, to keep the texture and patterns. You may also want to reinforce the stem, so add some brown to create more shadow where needed.


Leave the paints to settle. When you are happy it’s time to move on to the contrasting background.
Step 8: I have used a blue hue to around my green leaves to make them pop from the page! I mixed up a watery blue mix and using the side of my brush dragging the blue paint away from the leaves. Add more water to soften the blend if you want to extend the background further.

All finished! How does it look? Don’t forget to add your notes to the side of your painting, to remind yourself how you created the colours, or where you need to preserve highlights or where you would like to make any changes next time!
After I finished painting my holly and berries, using the colours left in my pallet I created some more complementary winter foliage. I went for pine cones and a spruce sprig. Why not have a go at creating your own winter foliage? I wonder what you will decide to paint?

I’d love to know and see your results if you do, so tag me on Instagram and use the hashtag #jenniferrosegallery so I can see how you got on. You can also find me on Facebook
Make sure you hear about my latest step-by-step guides, video mini-classes and inspiration journal entries – all for free – by signing up for my newsletter.
I can’t wait to hear from you!
Love Jennifer Rose xx

Leave Your Thoughts
Sign up to be able to leave your comments and thoughts.
Login
Register
The information that you provide here will only be used to deliver relevant updates from me. You can unsubscribe at any time. Click HERE for my privacy policy.